Setting up an excellent terminal experience
Introduction
As a developer, a solid terminal setup can help you work much more effectively. The keyboard driven nature of the terminal means you can get things done more quickly, and lets you easily automate workflows. However, a poorly setup terminal can add friction to your workflow and make it more painful to use than a GUI. This post will provide some advice on how to set up a smooth terminal experience.
But the default terminal experience isn’t so great. By default, it might be completely colorless, or the colors may be hard to read. There’s no reason we can’t do better in the 21st century.
Note about Windows: this post discusses Unix terminals. If you’re on Windows, it’s assumed that you’ll be using WSL.
Terminal emulators
To start, it’s important to pick a good terminal emulator (your “terminal program”). There are many good emulators out there and I don’t have strong recommendations, but choosing something which has tabs, the ability to split panes, and good support for colors and custom fonts is good. Wezterm is a good cross-platform terminal, which is what I use. I’ve also heard great things about Ghostty (Linux and macOS) and iTerm2 (macOS).
If you do go with Wezterm, you might find Quick select mode to be useful (docs). It lets you press a keyboard shortcut, and then type a few letters to select some text without having to touch your mouse.
One thing I like to do is to set ctrl+space as a shortcut to show/hide my always-on terminal. This makes it very easy to switch to and from the terminal no matter what else I am doing on my system. In iTerm2, search for “Hotkey” in the settings. In Terminator, it’s the hide_window shortcut in the keybindings section. Some terminals don’t have this built-in, and require that you set it up at the OS level.
Nerd fonts
Nerd fonts are specially patched fonts which include icons. This allows text-based programs, like the terminal, to display symbols and icons rather than just text. You can read more on the Nerd Fonts Website and pick a font you like. Personally, I use the FiraCode Nerd Font (download here). You’ll need to install the font, and then set it as the default in your terminal emulator’s settings. You’ll see later where these are used.
The shell
By demault, most systems use bash as the shell (or zsh on newer MacOS versions). I strongly recommend the Fish shell. Fish is easy to customize and add plugins to, like zsh, but far more performant. It also comes with very nice defaults so you don’t have to customize it as much. A non-exhaustive list of nice things it does:
- You can configure various features with a web UI by running
fish_config - It gives tab-completion for a large variety of commands
- As you type, it will highlight in red any invalid commands
- It shows the status of your git repository in the prompt if you’re in a repository
- It suggests commands from your history inline as you type
- History is synchronized between fish sessions
- You can define aliases that expand to a full command when you hit space or enter
- The prompt’s color will be green or red depending on whether your last command exited with success
- Highlighting of quote and paren matching
This is all out-of-the-box with to configuration on the user’s part, and you can read more about what makes Fish nice elsewhere. Note that you can still do your scripting in bash, running a script starting with #!/bin/bash will still use bash to execute it.
To get started with Fish, you need to install it on your sytem, and then set it as your default shell. You can do that with chsh -s (which fish) $USER. Or, you can simply set it as the default shell in your terminal emulator’s settings without changing it for your whole system.
Fish configuration
As previously mentioned, Fish comes with great defaults so I don’t need to customize it a lot.
However, you might still want to make some changes. You can run fish_config to select your prompt and theme. Your configuration is stored at ~/.config/fish/config.fish, and you can do useful things like add directories to your PATH, which you can do like so:
fish_add_path ~/.local/bin.
I do use a few plugins. I also use a few plugins. You can use Fisher to easily install plugins.
plugin-git GitHub link
This plugin provides a ton of hugely useful aliases for common git operations. If you incorporate them into your workflow, you’ll likely never have to type a full git command again. For example, gl for git pull, gcam for git commit --all --message, gd for git diff, etc. Even if you use only some of them, it can make your git usage seamless. The GitHub README has a full list.
fzf-fish GitHub link
This plugin allows for fuzzy searching of various categories in your terminal. Most importantly for me, ctrl + alt + f lets you search for files in your current directory, and ctrl + r lets you search through your history for previously run commands. You can also search through environment variables, your git log, running processes, and more. 
sponge GitHub link
The sponge plugin clears out invalid commands from your history. If you ran a command with a typo or a wrong argument or anything else that resulted in a non-zero exit code, it will remove it from your history so that it doesn’t come up when you search through it with ctrl + r. Personally I add set sponge_purge_only_on_exit true to my fish config so that this cleanup happens only after I exit the terminal, that way I can easily go back to see what wrong command I ran so I can re-run it correctly.
bass GitHub link
The last plugin I use is bass. This allows Fish to execute bash-style shell commands. Because Fish’s syntax is sometimes different, you may run into problems running a more complex command that uses bash-specific syntax. To get around this, you can either fire up bash and run it there, or you can just prepend bass to the command. I find this most useful when following instructions meant for bash to set up or run some program.
Terminal utilities
The terminal has a lot of great utilities, but many of them have been around for decades. While the stability is certainly nice, many of these utilities are the way that they are for historical reasons rather than because it’s the best implementation. Below are some replacement utilities which are often easier to use, and provide icons and colors in their output which make them easier to parse. Many are also more performant than the defaults.
Ripgrep
Ripgrep is a replacement for grep written in Rust. It’s faster, the command (rg) is shorter, and it provides more options, such as the ability to easily search (or not) git-ignored files. The output is also nicer, in my opinion. 
fd
fd is a replacement for find. Again, the command is shorter, and it’s also easier to use. When you run fd myfile, it will look for any files where the name contains myfile (the equivalent of *myfile* in find). 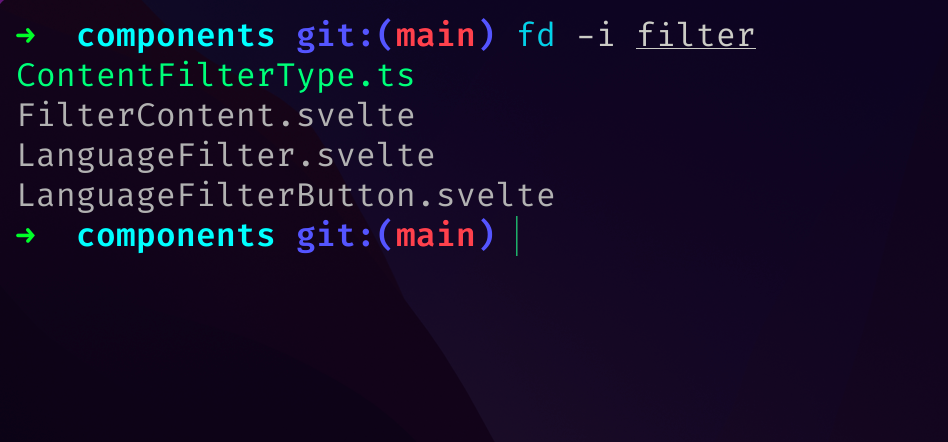
Eza
Eza is a replacement for ls that provides more colors and icons to make the output easier to visually scan. I personally have ls aliased to eza --icons. You can do this by putting abbr --add -- ls 'eza --icons' in your fish config. 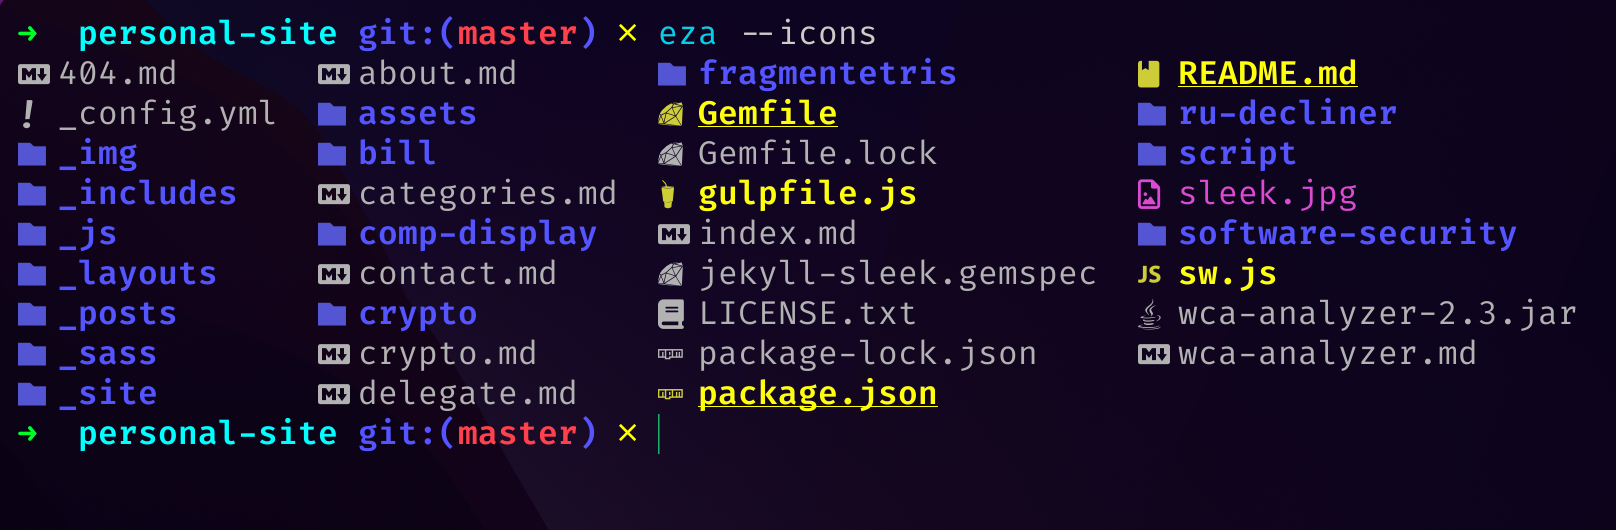
Ruplacer
Ruplacer is a find-and-replace tool for the commandline, powered by Ripgrep. You first run replacer tofind toreplace and it will show you a preview of which occurrences will be replaced. Then, re-run the command with --go and it’ll do the replacement for you. 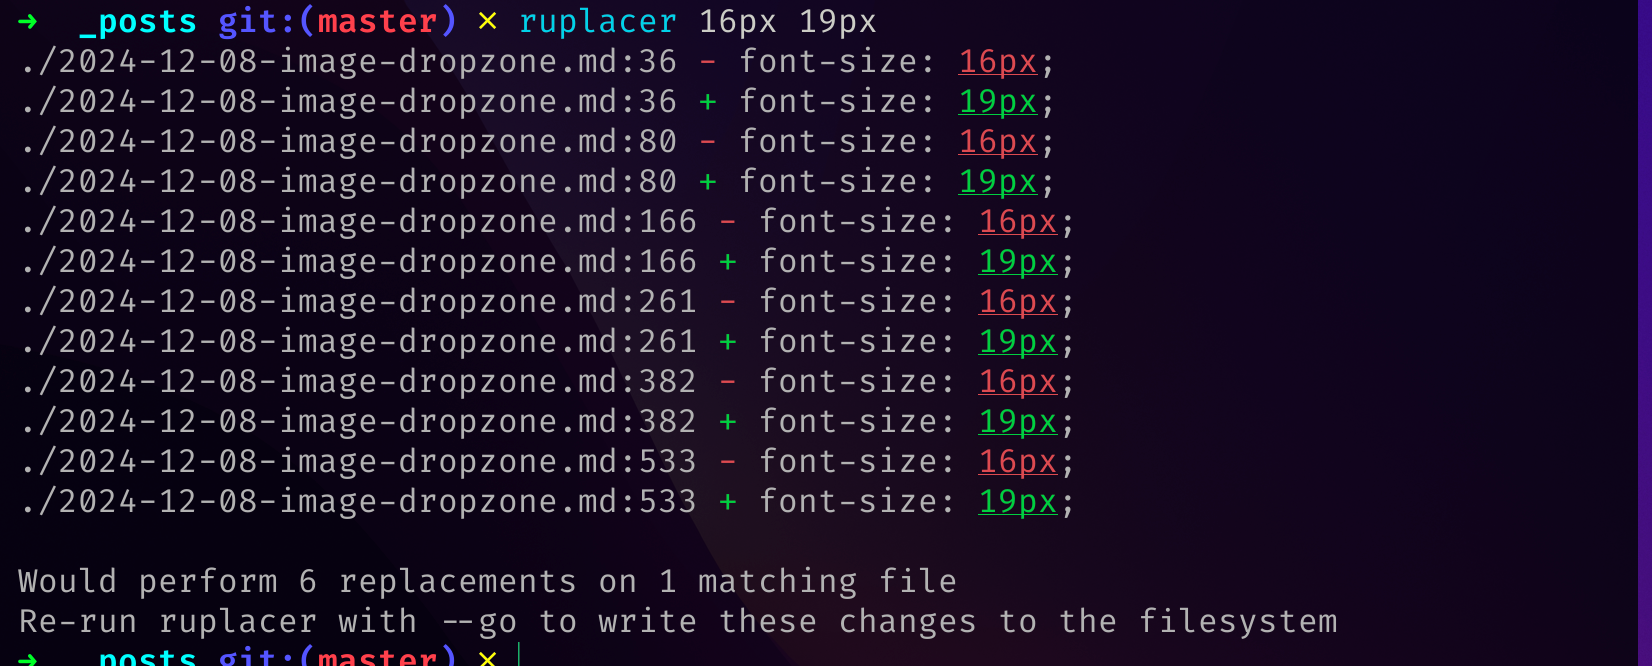
Disk Usage Analyzer
Disk Usage Analyzer (dua) is a command which quickly summarizes the disk usage used by a given folder, and which sub-folders or files are using the most space. It makes it easy to analyze why a folder might be bigger than expected.
K9S (if you use Kubernetes)
K9S is a termanal-based Kubernetes cluster manager. It saves you from typing long Kubernetes commands and lets you instantly see the status of pods, services, and other Kubernetes resources. If you use Kubernetes at all, and are comfortable (or willing to learn) some Vim-based shortcuts, I highly recommend giving K9S a try.
A note on Rust
You might have noticed many of the above tools are written in Rust. I didn’t pick these tools because of their language, but Rust is currently a popular language for writing system utilities because it makes it easy to write correct and performant code. It also makes it easy to install these programs using cargo. I’m perfectly happy to use tools written in other languages, these just happen to be the best ones I’ve found so far.
Terminal multiplexers
Many people use terminal multiplexers, such as tmux, screen, or Zellij. These are tools that allow you to manage tabs, split terminal panes, and more. Personally, I only use a multiplexer on machines I ssh into. That way, if I lose my connection, I can re-connect to tmux without losing all of my running programs, history, and other work. On my own machine, I just use my terminal emulator’s built-in tabs.
If you do ssh to a machine though, it’s crucial to use one of these programs for the reasons I just mentioned. Currently I use tmux because I like the keybindings, it has a good ecosystem, and I am already familiar with it. That being said, Zellij looks like a promising option and I may try it out sometime.
Editors
A terminal-based editor like Neovim, Emacs, Helix, or Kakoune can greatly enhance your terminal experience as well, but this is out of scope for this post. It’s also not a requirement, you can use whatever editor you prefer and still use the terminal effectively.
Conclusion
I’ve been using this setup with few changes for the past two years. If I find myself repeating the same command, I add an alias for it, which is easy to do and keeps my history understandable since the aliases auto-expand when I run them. This setup has made for a fluid terminal experience that has let me focus on my work rather than fighting with my terminal.